Sunday, December 22, 2013

Restaraunt Style Onion Rings

Do you like onion rings?  I do.  I'll even tell you a little secret.  I dip mine in cocktail sauce instead of ketchup.  I do.  I love it!   I don't like ketchup.  We don't even have it in my house.  But cocktail sauce...mmmmm.  And onion rings.  Big, huge, thick, crunchy onion rings!  And I have just the recipe for you.

 Restaurant Style Onion Rings

1 large yellow onion
2 eggs
1 1/2 cups milk
1 cup flour
1/4 cup cornmeal
1 tsp baking soda
1 tsp salt
1 cup bread crumbs
Oil for frying

 
Get out three bowls.  In the first bowl, use a fork and beat the eggs and milk together.  In the second bowl, mix the flour, cornmeal, baking soda, and salt.  Place the bread crumbs in the third bowl (I tossing in a pinch of salt to my bread crumbs because they were homemade versus the seasoned bread crumbs you buy at the store...more on that later).
 

Slice your onion in 1/2" slices (or as thick as you like your onion rings...I like big, thick ones so mine are probably closer to 1").


Dunk the onion into the egg mixture, then into the flour mixture.  Repeat.  Make sure to coat the onion well with the egg and flour.  You will dip the onion into the egg mixture twice and the flour mixture twice at this point.
 
Dip the onion back into the egg mixture (yep, the 3rd time...you can see the flour coating on the onion).  Coat it well.
 
This time instead of putting the onion into the flour mixture, you will put it into the bread crumbs.  Coat the onion very well. 
 
I use homemade bread crumbs.  Every time I make artisan breads, like this French Bread, if we have any leftover, I leave it out to get hard (overnight usually works) and then put the bread into the food processor/blender and make crumbs.  I keep them in the freezer just to keep them fresh.  It doesn't really freeze so there isn't any thawing necessary.  I don't season the crumbs since we use them in several recipes, so be sure to season them when you use them. 
 
 
Once you've coated the onion in the bread crumbs, it's time to fry it.  Drop it into your hot oil and cook for just a few moments (maybe 1 minute on each side...just until golden brown) on each side.  Make sure you flip the onion ring so both sides cook.
 
Take the onion rings out and drain them on a paper towel. 
 
Get out your cocktail sauce, or personal choice of dipping sauce, and munch these babies down! Enjoy!
 
Happily Homemade
Sandra


Friday, December 20, 2013

Peanut Butter & Chocolate Chip Cookies

What goes together better than peanut butter and chocolate?  Well, maybe chocolate and caramel, but that's another post for another day.  Today is all about peanut butter and chocolate!  And cookies.  Peanut butter cookies to be exact. 


Aren't they pretty!?  Not only do they taste fantastic...soft, chewy center, with a slight crunch on the outside like a good pb cookie should be...but they look beautiful too!
 

Peanut Butter Chocolate Chip Cookies

1 cup softened butter
1 cup peanut butter (you can use creamy or chunky...I used creamy but chunky would be awesome too!)
1 cup sugar
1 cup brown sugar
2 eggs
1 1/2 tsp baking soda
1 tsp baking powder
1/2 tsp salt
2 1/2 cups flour
2-3 cups chocolate chips (I used 3 cups...it gives it a really chocolate-y taste, use less if you prefer to taste the pb more than the chocolate...2 1/2 cups would probably be perfect!)
 
***As per my norm of late, I didn't take pics until the dough was already mixed.  I'm sorry.  I promise I will get the hang of the pictures someday!  Until then, I will only post recipes w/o pics if I have complete confidence in your ability to follow along easily with out the visual.  I KNOW you can do this recipe today!  It's mainly a toss everything in the bowl and mix.  Easy Peasy!***
 
Add the softened butter and pb to your mixer (or bowl and use a hand mixer).  Mix until well combined, almost fluffy (a couple minutes).  Add the sugars and eggs and mix for a few minutes until everything is combined well.  At this point, you are supposed to mix your dry ingredients together in a separate bowl and then add to the pb mixture...I, however, dislike doing dishes and cut out extra bowls if I can.  The reason you should mix your dry ingredients is to make sure you get the salt, powder and soda mixed well with the flour and don't get lumps of any in your cookie dough.  Trust me, it's not really pleasant to bite into a cookie and get a lump of baking soda...yikes! 
 
What I do, is add the baking soda, powder and salt to the pb mixture and keep mixing.  Make sure it is well combined and kind of fluffy.  Then I add the flour.  Everything gets mixed in and no extra bowls to clean!  That's my kind of cookie! 
 
Take your dough and add in the chocolate chips.  Mix by hand with a wooden spoon.  Your dough may seem a bit crumbly, that's ok.  It will come together when you scoop it out.
 
I took a spoonful of dough, rolled it into a ball and then pressed gently to slightly flatten the cookie.  Don't smoosh it, you don't want flat cookies, just a cookie shape instead of a ball. 
 
Bake them at 350 for about 10-12 minutes.  The time will depend on the size cookie you make.  Watch them.  Once they start to crack on the top and the edges are just barely getting golden, take them out of the oven.  Let them sit on the pan and the heat will finish cooking the cookie center.  This gives that perfect chewy, slightly crunchy pb cookie we all love! 
 
And since it's December, and the season for giving...I give you permission to eat these cookies for breakfast with your coffee!  I'm pretty sure December cookies have no calories, right?  YUM!  Enjoy!
 
Happily Homemade
Sandra


Thursday, December 19, 2013

Choco-Flan

Flan...pure caramely, custardy goodness.  On top of a chocolate cake.  I know, right?!  I'm not sure it gets better than that either!

I've eaten my fair share of flan and choc-flan since being married to Handsome Mexican, but only recently have I tried experimenting and making my own.  So, while it's not the most beautiful choc-flan you've probably seen...it is pretty tasty!

Choco-Flan

Chocolate Cake
You can use your favorite homemade chocolate cake mix or a box...I used a box this time since it was the first time I had tried making this recipe (the less steps, the better when it's an experiment!)

1 box of chocolate cake mix
Butter
Eggs
Milk
---I substitute melted butter for the oil and milk for the water in any boxed cake mix I use.  It gives it a lighter, and better, taste. I use the same measurements as called for on the box.

Flan

Caramel for the top of the flan:
1/4 cup water
1 cup sugar

Flan:
1pkg (8oz) cream cheese
4 eggs
1 can evaporated milk
1 can sweetened condensed milk
1 tsp vanilla

Preheat oven to 375.

Take the 1/4 cup of water and 1cup of sugar and add to a pot.  Stir just to mix and then let the sugar water come to a boil without stirring.  Once it's at a rolling boil (pic 1), turn the heat to med and let boil until it becomes a golden color (takes about 5-10 min...just keep watch but resist the urge to stir...if you have such urges. I do.)  Once it is golden in color, remove immediately from heat and pour into the bottom of your pan (you don't have to have foil on the bottom like I do...use a casserole dish, or cake pan, or ramekins...do NOT use a cheesecake pan like me...it will leak.  Yes, I know.  Duh.  Not exactly my brightest, shining moment in cooking.)
 
Mix your cake mix ingredients together and pour on top of the sugar, now caramel, mixture.  Don't freak about the end result being the caramel on the cake instead of the flan!  I know...I freaked the first time I was told to pour the cake mix on the caramel instead of the flan on top of the caramel.  But, get this, the cake will float to the top!!!  I know!  It's kinda magical!  Just wait and see.
 
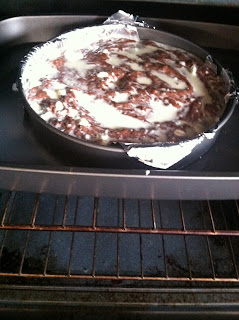
Mix together all the ingredients for the flan.  Mix well, really well.  Cream cheese and eggs don't tend to want to always mix super well, so be sure you get it really incorporated with everything else.  Then pour the flan mix on top of the cake mix.  You can see that the flan mix started to sink into the cake mix.  Don't worry...it will look like a mess.  You will then want to sit the pan into a much larger pan (I used our turkey pan).  Add enough HOT water to the larger pan to come up 1/2 way on your choco-flan pan.  Bake at 375F for about 1-1 1/2hrs or until a knife stuck in the middle comes out clean. 
This is how mine looked when it came out...not the most beautiful, but I totally blame my moment of "genius" (said sarcastically) in using a cheesecake pan.  Take the choco-flan out of the pan of water and let it cool (dump the water).  Once cooled, refrigerate for about 2 hrs.  Take out and flip onto a plate or cookie sheet,  or whatever flat dish you plan to serve it on.  You will then see all the yummy caramel ooze out over the flan, which magically set on the bottom.
See...this is what it looks like flipped over!  I have no idea how I put the cake mix in first with the flan mix on top and it reversed itself while cooking, but it did!  The flan is really good by itself also, if you ever want to just make the flan sans chocolate cake.  Just skip the cake portion of the recipe and do all the other steps.  You would cook it for a little less time also.  So, there ya have it!  Choco-flan!  Enjoy!!
 
 
Happily Homemade
Sandra


Monday, December 16, 2013

A Little Cooking Adventure...

I have to admit, this food blog isn't as easy as I had hoped it would be.  And not for the obvious reason of having to cook something new all the time.  But because I have to take pictures while I do it!  I actually cook something homemade every single day...sometimes several items a day...only to forget to take pictures of 1/2 the steps it took to make it!  Can we say, "Argh!"!!  haha

So, today, I needed to make some french bread and thought I would teach y'all how to do make yummy french bread rolls...only to, again, forget to photograph the steps to get you to the dough stage!  So, then I decided to try a desert I have been wanting to make forever...choco flan.  It's like flan on top of a chocolate cake!  However, I forgot again to take a few pics! 


Sad, right?!  Well, I'm going to try to help you make some french bread, hopefully, the lack of pics won't hinder you.  And if that doesn't work, I'll show you how I've made the choco flan (give or take a few pics) in another post later.  Someday I will get into the habit of photographing everything I do!  I promise!

French Bread

3-3 1/2 cups flour (I used both all purpose-which most people have in the kitchen-and bread flour...both work.  In these pics, I've used bread flour)
1tbsp sugar
1tsp salt
2 1/4 tsp active dry yeast (or one envelope)
1 cup warm water (hot tap water works fine)
2tbsp oil
cornmeal (for dusting pan when baking)

 
Take your yeast and add it to the warm water in a bowl.  Stir and set aside to work it's magic.  Add 2 cups of the flour, the sugar, and salt into the bowl of your stand mixer (or mixing bowl if doing all this by hand).  Check the yeast (about 5 min after adding to water).  It should be at least foamy.  Mine ended up with bubbles because I got distracted with my kiddos and let it sit for about 15 minutes.  Not necessary to see the bubbles. 
Add the yeast and oil to the flour mixture and, with your dough hook (or wooden spoon), begin to mix on low until you get a sticky dough.  Add 1 cup of flour and continue to mix.  I only needed to add a total of 3 cups of flour (2 to start, then 1 while mixing).  If using a stand mixer you probably won't need more flour.  If mixing by hand, you will need to dump the dough out on a counter and start kneading.  Add more flour as needed to help with stickiness.  Try to add as little flour as possible though...the more flour, the denser the bread.  Once your dough is soft and smooth, you are ready!
 
 Spray a bowl with cooking spray and roll the dough around.  Cover with a towel and place in a non-drafty place to rise.  I always stick my dough in the oven (turned off).  Let rise for a couple hours.  Since this is french bread, we want a light and fluffy inside. It takes a longer rise than other breads. 
 
Once the dough is fully risen, it should definitely be doubled in size and when poked, the hole should stay (see hole in the middle).  If you leave it longer than 2 hrs (and do something crazy like make  "quick" run to Costco), you may see what look like bubbles forming on the top.  This is perfectly ok and means your yeast is fantastic!  Gently push the dough down and turn out onto your counter.
 
You can shape the dough into a long baguette, french bread loaf, or like I did, smaller french bread rolls.  We are using these to eat with our Crockpot Sunday Pot Roast so I wanted individual-sized bread for the French Dip Sandwiches.  Once you have your dough rolled out and shaped, cut slices into the top (not super deep...maybe 1/2" max).  Go ahead and use some cornmeal and dust whatever pan you are using (I have a pizza stone I use for my artisan type breads, but a cookie sheet works too).  The cornmeal will keep your bread from sticking to the pan.  Cover again and let rise until doubled in size, about 1 hr. 
 
When ready, bake at 375F for about 20-30 min (depending on the size loaf you made) or until golden brown.  Tap the bottom of the loaf and if it sounds hollow, it's ready.  Enjoy!
 
 
Happily Homemade
Sandra


Friday, December 13, 2013

Chicken Pot Pie

Today we are making homemade Chicken Pot Pie!  MMMmmm...there is just something about a warm pot pie that spells comfort!  And, it's a great way to use up those Roasted Rotisserie Chicken leftovers, too! 

Chicken Pot Pie

1 1/2-2 cups of chopped leftover, cooked chicken
3 cups frozen veggies (I used a California mix of broccoli, cauliflower, carrots, and yellow squash)
1/4 cup butter (1/2 stick)
1 1/2 cups cream of mushroom soup (I make mine from scratch vs buying it in a can...here's a great recipe for Cream of Mushroom Soup)
1 tbsp chicken base
1/2 cup water
Pepper to taste

Pie Crust

2 pie crusts (one for top and one for bottom...I made my own, but you could buy the rolls of pie crust if you want.  Making the pie crust wasn't really difficult and it tasted a million times better!  Try it!)

2 1/2 cups flour
2/3 cup shortening
1tsp salt
1/2 cup cold water

Pie crust is pretty easy to make.  Just take all the ingredients and mix in a bowl until combined.  You may need to use your hands as it will seem pretty crumbly.  Once you work it up with your hands, it will come together nicely.  Separate the dough in 2 equal halves, roll into a ball, and then flatten into a disk shape.  Wrap in plastic wrap and chill for an hour at least in the fridge.  When ready to use, take out and let sit on the counter for 5-10 minutes to make rolling easier.
 
Get out that rolling pin and roll out the dough until it's about 1/4" thick.  Don't worry if the edges look crummy, they will get trimmed up anyway.  Make sure you make it big enough to fit whatever dish you are using.  I used a 8 x 8 (or maybe it's a 9x9) casserole baking dish.
 
Place the crust in your dish and press gently into all corners/bottom.  Don't worry about any overhang, we'll trim everything up before we put it into the oven.
 
While the pie crust is waiting, add the butter to a large pan and melt.  Throw in those frozen veggies and saute just until they are unfrozen...you don't want to cook them!  You want them to be crunchy still because they will continue to cook in the pie. 
 
Add the chopped chicken, cream of mushroom soup, water, chicken base, and dash of pepper. Mix around until everything is coated well.  Your filling shouldn't be super thick or super runny...if it's too water-y, add some more chicken or veggies or mushroom soup.  If it's too thick (you don't have any extra like in the pic) add a bit more water and adjust the chicken base accordingly (taste it...you want it to taste good).
 
Add the filling to the pie crust.  It's ok if it looks like a lot of filling.  Once in the oven, the veggies will cook down a bit.
 
Add the top crust and trim any overhang (yes, I used those scissors in the pic...ghetto, huh? haha).  Crimp your edges to seal in all the goodness.  I'm not a professional crimper...just make sure the top crust and the bottom crust are "smooshed" together so none of the filling seaps out. 
 
I had some leftover pie dough that I didn't want to toss, so I rolled it out and used a cookie cutter to add pretty hearts to the top.  You can do this if you want, totally optional and won't change the pure yumminess of the chicken pot pie.  If you do add shaped dough to the top, dip the cutouts in milk and place them on the crust.  The milk will help to seal the cutouts to the crust.  Poke a few fork holes around the crust and place in the oven at 400F for about 50-60min or until the crust is golden brown.  If using a smaller pie pan, adjust your time accordingly.  Once the pot pie is done, let it sit for about 15min so the juices thicken up.
 
  Mmmm...I have to admit, this is one of the prettiest chicken pot pies I have ever made!  The homemade crust was thick and had a crunch that store-bought crust just doesn't have.  Store-bought crust is good, don't get me wrong, and I do use it when I don't have time to make my own...but after making this crust, I will be hard pressed to find an excuse to spend the money on crust.  Homemade crust costs pennies and was really simple.  Give this pot pie a try and let me know what you think!  Enjoy!
 
Happily Homemade
Sandra


Thursday, December 12, 2013

Thursday's Money Saving Tips

Last week I started a Thursday Money Saving Tip post...and it was very well received, so I think I will continue.  Please understand, I am not an expert on anything, and there are many people out there that could take what I do and do it a million times better!  These tips are just a few of the things I have learned to do to save some money for my family.

If you read the post last week with a few tips on saving money with your grocery budget...how did that work for some of you?  Did you try any of the tips?  Have you made out your menu?  Have you deviated from your menu?  I did...last night was supposed to be Chicken Tortilla Soup with leftover roasted chicken...but I ended up wrapping Christmas presents and burned the beans I was cooking for the soup. :(  I know.  I hate wasting food, especially when it's something silly like burning food.  *sigh* But it happens, so moving on. 

Instead of making something else, we decided to go out to dinner.  Please note, this is NOT our solution to anytime dinner doesn't go as planned!  We have a monthly eating out budget too and we still had enough to go out as a family once more.  So we went to Souplantation.  I love that place! 

Anyway, today I'm going to talk about budgeting.  If you don't have a monthly budget for everything, you won't end up saving anything.  It's true.  Most people, myself included, dislike the thought of having a budget.  Wouldn't we all LOVE to just spend whatever money we want, whenever we want, on whatever we want?!  Of course!  However, unless you are related to Bill Gates, it's probably not going to happen (or it will get you into a lot of trouble financially, and we don't want that)!


1.  Keep Track of ALL Your Expenditures.  This one is hard for some of us.  I know it was for me!  I am a spender by nature.  My husband is the saver.  Even though I consider myself to be cheap, I still love to buy lots of cheap stuff!  I actually have to forceably remove myself from stores at times.  I LOVE shopping!  However, my love of buying stuff was killing our finances!  So, we had to start keeping track of EVERYTHING we spent!  You know that coffee at Starbucks...write it down.  That quick trip to the store to get milk that ended up costing you $75?  Write it down.  As my husband likes to say, "If you can track it, you can manage it."  If you aren't paying close attention to what you are REALLY spending each month, you'll always wonder where the money went.  It's not enough to just know how much your mortgage/rent, utilities, and car payment are.  You MUST know where you spend everything.  Only then can you set reasonable limits and keep track of your money.

2.  Set a Budget.  A lot of people think this is the first step.  But it's not.  If you haven't figured out that you spend $200 a month eating out, you'll neglet to put this in the budget...and then wonder what happened to $200!  Once you know where all your money goes, then, and only then, can you allot certain amounts to each category.  For example, every month you know a certain amount of money goes to set items...rent, utilities (these may fluxuate, but you can usually guestimate based on past experience), car payment, etc.  Set this money aside for these things.  Then, since you kept track of what you actually spend on other things, you can set a budget for those.

If you realize you spend $900 mo on groceries, you can decide that this month you will only spend $800. You probably won't even notice the difference...maybe you will. I can bet that you'll see that you ate pretty well even without that $100. And then you could do it again next month. And if you only save $100 each month, that's $1200 at the end of the year! What could you do with that $1200??? 

If you see you spent $200 eating out, try looking at when and why you ate out?  Was it because every Wed the kids have soccer and dance practices until 7pm and you swing through and grab something?  Do you fail to plan and prepare dinner and so you order pizza 2 times a week?  Can any of these be cut out?  Can you prepare ahead of time and have a cooler with sandwiches and cut fruit and veggies in the car for those late days of the kids' practices?  Here is where a menu will help also.  There won't be any guessing as to what's for dinner and you will have already gotten the groceries. 

My suggestion is to set a limit to eating out 2-3 times a MONTH, max.  And use those times as family date nights versus a quick trip to a drive thru.  Decide how much it would cost your family to eat out 2-3 times and put the money aside for that amount only...and STICK TO IT!  It's easy to just grab something out, but resist...you'll save money and be feeding your family healthier food by eating at home.

This will shock some of you, but we have a $50 a month budget for eating out.  This usually gets us 2 family dates.  Granted, we have a 2yr old who doesn't eat much, but we actually still have to pay for her at most of the places we go to, so it's isn't like she is free.  We also don't do 5 star restaraunts.  How do we do it?  Well, we use coupons when we can. 

For example, last night, all 4 of us went to the souplantation for a late lunch (dinner starts at 4pm and prices go up.  Go in at 3:30pm, have an early dinner, pay less, and then if the kids get hungry later in the evening, a light snack will usually suffice...fruit and yogurt, popcorn, etc).  We paid $25 for all of us last night.  We used a coupon for 2 adults (w/ drinks...if drinks aren't included we get free water...saves $2+ ea AND a few calories) for $17.99, and the kids were a few bucks each.  We spend a couple hours there enjoying some quality family time and eating (we are big eaters!).  It was a great time out and still in our budget.  And we could do this twice a month.  So, every other week we get to look forward to a great family date.  Get creative...your kids will appreciate the family time spent together more than they will the food anyway.

3.  Stick to Your Budget.  If you don't stick with the budget you just made, what's the point?  Will it be easy?  Maybe.  Depends on how much you adjusted what you typically spend to what you plan to spend.  If your groceries dropped from $900 to $800, maybe it won't be very difficult.  If you change the eating out from $200 to $50...yes, it will be difficult.  You'll have to change habits, which is the most difficult.  But, it's doable!  Don't give up!  Even if you slip and spend $75 instead of the goal of $50, keep trying.  Set the budget again next month and try again.  If you find that you are consistently spending $75 eating out instead of $50, then maybe you need to adjust your budget. Nothing is set in stone, and everything can be adjusted.  And that's ok!  It's a learning experience.  Just keep working your budget and you will get to where you are consistently sticking to it. 

Whew!  That was a lot of info!  I hope some of it helps you and your family!  Please remember, these amounts given are what works for my family...adjust accordingly or your own.

Happily Homemade
Sandra


Wednesday, December 11, 2013

Waste Not, Want Not...Candied Orange Peels

I hate wasting stuff...food, craft supplies, gardening items (dirt included).  Partly it's because I just want to feel like I have used everything to the best of my ability, but mostly it's because I'm cheap.  I am.  If I can pay $1 for something versus $3...I will.  Doesn't matter if I have to wait 3 months to get it...I will go nuts if I give in and spend more than I know I should.  And negotiating/bartering...don't get me started...I'm every Craigslist seller's worst nightmare when it comes to negotiating prices. 

What does that little tidbit about my psychotic self have to do with anything?  Well, when I do buy something, I want to make sure I use as much of it as possible. 

Oranges, for example.  I bought about 20 big, beautiful navel oranges at the beginning of the month for 3lbs x $0.98.  I LOVE navel oranges.  They are one of my favorite fruits.  I like them so much because they don't have seeds (another one of my crazy issues...fruits with little seeds annoy me).

However, after eating one they other night, I realized I had these beautiful orange peels and would have to throw them away.  I thought about orange peel, but don't have one of those zesters (yet...hopefully Santa brings me one for Christmas).  So, I decided to make some candied orange peel.  And it is awesome!  Tastes like orange sugar! Ha.

And it makes me feel good because I didn't waste any part of those beautiful oranges.

Candied Orange Peel

Peel from abut 6 large oranges
4 1/2 cups sugar plus extra for dusting the orange peels
1 1/2 cups water

Slice your oranges in even sized slices and peel.  Eat the orange, keep the peel for the candied peels.
 
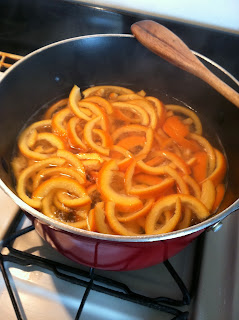
Add cold water, enough to cover the peels, and bring to a boil.  Boil for a couple minutes, then drain the water.  Add more cold water and boil again.  Do this about 3 times (the 2nd pic is the last boil) so that you get rid of the bitterness that comes with the peel.
 
After the 3rd boil, drain the orange peels, saving 1 1/2 cups of the boiling water.  Add 4 1/2 cups of sugar to the orange water.  Place the pan on medium heat and cook until the sugar disolves...the sugar water will become clear.  Try not to stir too much as this will make sugar crystals (hardened sugar) and you want syrup.
 
Once the sugar has dissolved, add in the orange peel and turn up the heat to med-hi and bring to a boil.  Turn down to medium and allow the oranges to simmer for about 45 minutes or until the oranges are darker in color.
 
You can see the oranges are darker in color.  Be careful at this point.  Everything is sticky and the syrup is EXTREMELY hot!  Use caution.
 
Add the orange peels to the extra sugar and shake them around.  You want them completely coated with sugar.  Lay out on some wax paper (or aluminum foil if you don't have paper) and allow to dry for about 4-5 hrs, although they are good right out of the sugar pan!
 
That's it!  Pretty easy way to make some orange candy without all the weird chemicals that come in store-bought stuff!  Enjoy!
 
 
Happily Homemade
Sandra